...
New in Xenon Drop 3 の新機能The
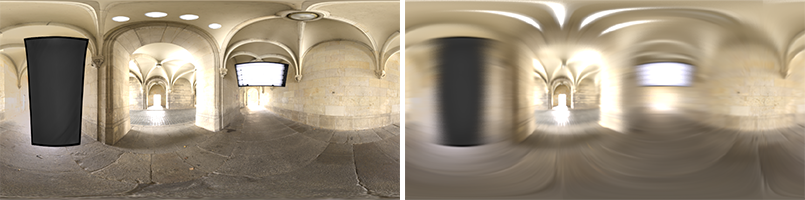
Motion Blur filter is used to provide a linear motion blur effect. The example image above shows an HDRI map used for lighting and for the background image that was motion blurred using this new filter.
Things you can do with Motion Blur
Easily add linear motion blur in any direction to your whole HDRI map.
...
Add motion blur to an edited HDRI map
Add lights and adjustments to an HDRI map and those are included in the motion blur. Move lights within the lighting design and they get motion-blurred on the fly.
...
Design a static lighting design and then add motion blur to the final design.
...
Add moving objects to a static HDRI map.
In this example, we are showing a moving car and aircraft, each with their own motion blur direction.
...
Add motion blur to certain areas of the map using masking/alpha.
In this example, we have blurred only the road, which is more correct as the sun and far off parts of the image would not appear to move.
...
Motion Blur Filter Settings
Type - Spherical
...
With the Spherical setting, Motion Blur is applied taking into account the image is an HDRI map with lat-long mapping.
U and V Directions
The U and V Directions control the direction of travel for the motion blur within the HDRI map image space. Example settings and results can be seen in the image below.
Please note: The blue arrows and green dot have been added to help your understanding of the motion blur direction for the given settings.
...
Using the sliders is not the best way to set the direction. There is a far more intuitive way of using the LightPaint tool on the Canvas and Render Views.
When a light is selected with a Motion Blur (Spherical), the LightPaint Tool drop down on the Canvas or Render View is updated to include a Motion Blur option. Select this option to position the direction for the motion blur.
Now if you click on the Render View, the LightPaint mode of Reflection, Illumination or Rim will be used to position the direction for the motion blur. This will update the U and V Directions in the properties panel.
...
Now if you click on the Canvas, you will directly position the direction for the motion blur on the HDRI map. This will update the U and V Directions in the properties panel.
...
Blur Length
Controls the length of the motion blur. A larger value gives the impression of moving faster. Example settings and results can be seen in the image below.
...
Bias
This setting allows artistic control over the motion blur. The default setting is 1 and is most physically correct. But using a higher Bias value the non blurred area of the HDRI map in the direction of travel increases. You may want to adjust this if you have a visible HDRI map in the background of your shot and you want to control at what point the map starts to become motion blurred.
...
Accuracy
There are 3 accuracy settings: Low, Medium, and High.
The higher the setting, the smoother the result but it will take a little longer to render.
Type - Planar
...
Use this setting to apply Motion Blur to flat images. For example the appearance of an Area Light.
Blur Angle and Blur Length
These settings control the direction and amount of motion blur.
...
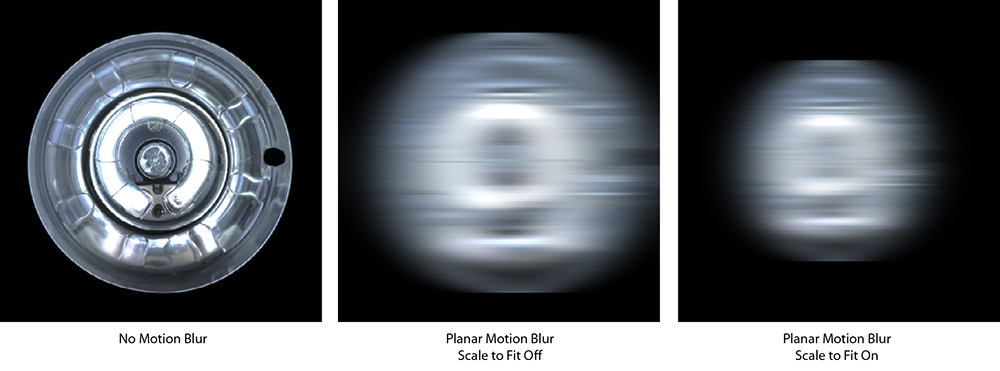
Scale to Fit
With this setting On, the blurred content will be scaled to fit inside the image dimensions - maintaining soft edges.
The higher the blur length, the more the image is reduced in scale to fit.
With this setting Off, the image will be blurred without scaling. As the blur length increases, the blur will spill over the edges of the texture space.
...
Accuracy
There are 3 accuracy settings: Low, Medium, and High.
The higher the setting, the smoother the result but it will take a little longer to render.
Motion Blur Tutorials
Now you have learned the basics, why not watch the 3 motion blur tutorials to see motion blur in action.
Motion Blur - Tutorial 1 - Introduction
Motion Blur - Tutorial 2 - Using gradient to mask motion blur
Motion Blur - Tutorial 3 - Using alpha image to mask motion blurフィルターは、直線的なモーションブラー効果を提供するために使用されます。上の例の画像は、この新しいフィルターを使用してモーションブラーが適用された、背景画像およびライティング用の HDRI マップを示しています。
Motion Blurでできること
HDRIマップ全体に対して、任意の方向の直線的なモーションブラーを簡単に追加できます。
...
編集したHDRIマップにモーションブラーを追加できます。
HDRIマップにライトや調整を加えると、それらもモーションブラーに含まれます。ライティングデザイン内でライトを移動させると、オンザフライでモーションブラーがかかります。
静的なライティングデザインを行い、最終的なデザインにモーションブラーを追加できます。
...
静的なHDRIマップに、動いているオブジェクトを追加できます。
こちらの例では、それぞれ独自のモーションブラーの方向を持つ、移動している車と飛行機を表示しています。
...
マスキングまたはアルファを使用して、マップの特定の領域にモーションブラーを追加できます。
こちらの例では、道路のみをぼかしていますが、太陽や画像の遠くの部分は動いていないように見えるため、より正確です。
...
...
Motion Blur Filterの設定
Type - Spherical
...
Sphericalの設定では、画像がLat-LongマッピングのHDRIマップであることを考慮して、Motion Blurが適用されます。
U DirectionおよびV Direction
U DirectionおよびV Directionは、HDRIマップの画像空間におけるモーションブラーの進行方向を制御します。設定例と結果は、以下の画像でご覧ください。
ご注意:青い矢印と緑の点は、与えられた設定におけるモーションブラーの方向を理解しやすくするために追加されたものです。
...
スライダーを使用することは、方向を設定するための最良の方法ではありません。CanvasとRender ViewでLightPaint ツールを使用する、はるかに直感的な方法があります。
Motion Blur(Spherical)でライトを選択すると、CanvasまたはRender View上のLightPaint ToolのドロップダウンがMotion Blurのオプションが含まれるように更新されます。モーションブラーの方向付けを行うには、このオプションを選択します。
ここで、Render View上をクリックする場合は、Reflection、Illumination、RimのLightPaint モードで、モーションブラーの方向づけが行われます。これにより、プロパティパネルのU DirectionおよびV Directionが更新されます。
...
ここで、Canvas上をクリックする場合は、HDRIマップ上のモーションブラーの方向づけを直接行えます。これにより、プロパティパネルのU DirectionおよびV Directionが更新されます。
...
Blur Length
モーションブラーの長さを制御します。値を大きくすると、動きが速くなる印象を与えます。設定例と結果は、以下の画像でご覧ください。
...
Bias
この設定により、モーションブラーをアーティスティックに制御することができます。デフォルトは1で、最も物理的に正しい設定です。しかし、より高いBiasの値を使用することで、進行方向でのHDRIマップのぼかされない領域が増加します。ショットの背景にHDRIマップが表示されており、マップのどのあたりからモーションブラーをかけるかを制御したい場合は、これを調整するとよいでしょう。
...
Accuracy
3つの正確さの設定があります:Low、Midium、High
その設定が高いほど、結果はより滑らかになりますが、レンダリングに少し時間がかかるようになります。
...
Type - Planar
...
この設定は、平面の画像にMotion Blurを適用するために使用します。例えば、Area Lightの外観です。
Blur AngleとBlur Length
これらの設定は、モーションブラーの角度と長さを制御します。
...
Scale to Fit
この設定をOnにすると、ぼかしたコンテンツは画像の寸法に収まるように拡大縮小され、ソフトエッジが維持されます。
Blur Lengthが長いほど、寸法を合わせるために画像がより縮小されます。
この設定をOffにすると、画像はスケールされずにぼかされます。Blur Lengthを増加させると、ブラーがテクスチャ空間のエッジからあふれ出るようになります。
Accuracy
3つの正確さの設定があります:Low、Midium、High
その設定が高いほど、結果はより滑らかになりますが、レンダリングに少し時間がかかるようになります。
Motion Blur Tutorials
これで、基本を学習しました。モーションブラーの動作を確認するために、3つのモーションブラーのチュートリアルを見てみましょう。
Motion Blur - チュートリアル1 - 使い方
Motion Blur - チュートリアル 2 - グラデーションを使用してモーションブラーをマスクする
Motion Blur - チュートリアル3 - アルファ画像を使用してモーションブラーをマスクする