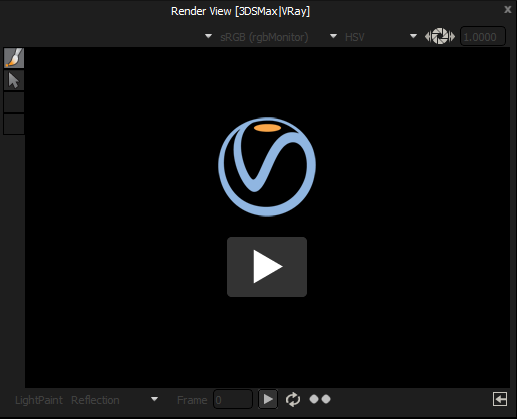
The view name is derived from the current connection - for example ‘Render View [3dsMax|V-Ray]’
This view is displayed by default using Connections that can support this feature, but it is renderer specific.
This view is not displayed by default when using HDR Light Studio standalone
This Render View starts/stops and displays the interactive rendering from your host/renderer directly in HDR Light Studio's interface.
This Render View is currently supported by the 3ds Max, Maya, MODO, Cinema 4D, Rhino 6/7, Octane Render Standalone Connections.

Move Active Light using LightPaint tool
Click on the render image to position the active light using the current LightPaint setting and mode.
Select Light Tool
Click on the render image to select a light using the current LightPaint mode selected in this view.
Play/Pause (Start/Stop Rendering)
Use the play/pause button to start and stop the interactive rendering in your main 3D software. That render is displayed in this view.
This interactive render may, or may not, be seen running in your 3D software.
When first starting HDR Light Studio (when connected to supported 3D software), the logo for the renderer and a big play button will appear on the view.
This play button is used to start the rendering, just like the small play button at the bottom.
Resync
Stops and restarts the rendering. If the lighting has got out of sync, this is a good way to reset the rendering.
Image Requested/Received Lights
The image requested and image received lights provide show the status of the polling for images from the renderer.
Resize IPR to fit view size button
Press this button to update the render width and height back in your main 3D software to match the current size of the Render View in HDR Light Studio.
Please refer to the Render View (HDR Light Studio) docs for the following features in this panel: Display Settings, LightPaint
Advantages and Disadvantages of showing your IPR in this panel
Advantages
•Use HDR Light Studio on a single display showing everything you need in a single interface.
•Accurate: Light your shot looking at the final result from your 3D software/renderer. No guessing - what you see is what you get!
•Click to place lights directly into the final shot.
•No need to export the host 3D scene into HDR Light Studio using this view. Faster workflow.
•Also shows any lighting not created using HDR Light Studio
Disadvantages
•Can be less responsive/interactive than HDR Light Studio’s own renderer: Due to the time for communication and data transfer between HDR Light Studio > Host > Renderer > Host > HDR Light Studio, this view can be slow to update due to this round trip. Render Settings in your host/renderer may also mean this view refines slowly, meaning a longer wait to make lighting decisions. Interactive performance depends on scene complexity, render settings, shaders and hardware.
•LightPaint clicks only to position lights, no dragging lights in this view to discover lighting sweet spots.
•LightPaint positioning can be less reliable than HDR Light Studio’s render view.